Table of Contents
ToggleIntroduction
If you’ve been trading gold for a while, you’ve probably asked yourself, “What are the best EMA settings for XAUUSD?”
I had the same question when I started trading Gold (XAUUSD). I tested many EMA combinations, from short-term scalping setups to long-term trend-following strategies. Some worked for a few days, while others produced too many false signals.
After months of testing and reviewing my trades, I found one EMA combination that made my trading much simpler. It didn’t win every trade, but it helped me identify the trend more clearly and avoid many bad entries.
In this article, I’ll share the EMA settings that improved my trading results, how I use them, and the mistakes you should avoid.
My Journey Finding the Best EMA Settings for XAUUSD
When I first started trading gold, I constantly changed my indicators.
One week I used the 9 EMA.
The next week I switched to the 20 EMA.
Then I tried 50 EMA, 100 EMA, and even combinations of four or five moving averages.
The problem wasn’t the EMA itself.
The problem was that I kept changing my strategy before giving it enough time to prove whether it worked.
After reviewing dozens of trades, I realized that consistency was more important than finding the “perfect” EMA.
That’s when I settled on one setup and traded it repeatedly.
The Best EMA Settings for XAUUSD That Worked for Me
The EMA combination that helped me the most was:
- 20 EMA – Shows short-term market momentum.
- 50 EMA – Confirms the medium-term trend.
- 200 EMA – Identifies the overall market direction.
I don’t consider these settings magical.
They simply filter out much of the market noise while keeping me on the right side of the trend.
Why I Chose These EMA Settings
I noticed several improvements after using this setup consistently.
1. Better Trend Identification
When the 20 EMA stayed above the 50 EMA, and both were above the 200 EMA, buyers were clearly in control.
Instead of guessing the direction, I simply followed the trend.
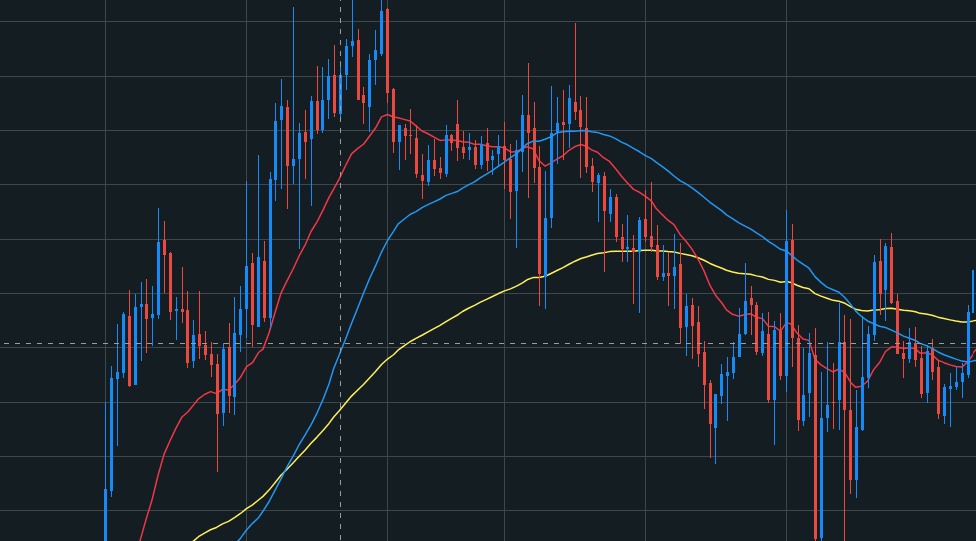
This alignment tells me that buyers are in control across the short-, medium-, and long-term trends. Rather than predicting reversals, I trade in the direction of the existing trend.
2. Fewer Bad Trades
Previously, I traded every pullback.
Now, I only take trades that agree with the EMA trend.
This alone reduced many unnecessary losses.
3. More Confidence
One of the biggest benefits wasn’t just profit.
It was confidence.
When my setup matched my trading rules, I stopped second-guessing every entry.
Why I Chose the 20 EMA, 50 EMA, and 200 EMA for My Best EMA Settings for XAUUSD Strategy
After testing different EMA combinations on XAUUSD, I realized that constantly changing indicators wasn’t helping my trading. I tried the 9 EMA, 10 EMA, 21 EMA, and even more complex setups with multiple moving averages. While some worked in certain market conditions, they often produced inconsistent results.
Eventually, I stopped looking for the “perfect” indicator and focused on building a strategy I could follow with confidence. That’s when I settled on the 20 EMA, 50 EMA, and 200 EMA. These became the foundation of my Best EMA Settings for XAUUSD strategy because they provide a clear view of the market without adding unnecessary complexity.
The 20 EMA – My Entry Guide
The 20 EMA helps me track short-term momentum. During a strong trend, I often see price pull back toward this EMA before continuing in the original direction. Instead of chasing fast-moving candles, I wait patiently for these pullbacks and then look for price action confirmation before entering a trade.
For me, the 20 EMA is not a buy or sell signal on its own. It simply tells me where I should pay close attention to a potential trading opportunity.
The 50 EMA – My Trend Confirmation
The 50 EMA confirms whether the market is still respecting the trend. If the 20 EMA remains above the 50 EMA during an uptrend, I know buyers are still in control. Likewise, when the 20 EMA stays below the 50 EMA, I focus only on selling opportunities.
Using the 50 EMA has helped me avoid many trades that looked attractive but were actually against the prevailing trend.
The 200 EMA – My Market Filter
The 200 EMA is the most important part of my strategy because it filters the overall market direction. Before taking any trade, I first check where the price is trading in relation to the 200 EMA.
- If price is above the 200 EMA, I only look for buy setups.
- If the price is below the 200 EMA, I only look for sell setups.
This simple rule has helped me stay on the right side of the market and avoid trading against the dominant trend.
Why This EMA Combination Works for Me
The reason I continue using this setup is its simplicity. I don’t need five or six indicators covering my chart. These three EMAs provide everything I need to understand the market:
- The 20 EMA shows short-term momentum.
- The 50 EMA confirms the strength of the trend.
- The 200 EMA identifies the overall market direction.
When all three align, I have greater confidence in the trend. However, I never enter a trade based on EMA alignment alone. I always wait for a price action confirmation, such as a bullish or bearish engulfing candle, a pin bar, or a rejection candle before placing an order.
My Personal Trading Rule
One of the biggest lessons I learned is that the Best EMA Settings for XAUUSD are only effective when combined with discipline. My strategy is not about taking every EMA crossover. Instead, I use the EMAs to identify the trend, wait for a pullback, confirm the setup with price action, and manage my risk on every trade.
This approach has helped me become more consistent because I stopped guessing market direction and started trading with a clear set of rules. While no strategy guarantees profits, this EMA combination has become the foundation of my XAUUSD trading plan and is the setup I trust the most.
How to Set Up EMAs on Your Trading Platform
Setting up your chart correctly is the first step to using the Best EMA Settings for XAUUSD effectively. Whether you trade on TradingView, MetaTrader 4 (MT4), or MetaTrader 5 (MT5), adding Exponential Moving Averages (EMAs) is quick and straightforward. I use the same setup on every chart because consistency is one of the biggest reasons my strategy works.
Step 1: Open the XAUUSD Chart
Open your trading platform and select the XAUUSD (Gold) chart. Then choose the timeframe that matches your trading style. I usually analyze the higher timeframe first to identify the overall trend before looking for entries on the lower timeframe.
Step 2: Add the 20 EMA
Click on Indicators and search for Exponential Moving Average (EMA). Add the indicator to your chart and set the period to 20. I use a red color for the 20 EMA because it helps me identify short-term momentum quickly. This is the first component of my Best EMA Settings for XAUUSD strategy.
Step 3: Add the 50 EMA
Repeat the process and add another EMA with a period of 50. I use blue for the 50 EMA to make it easy to distinguish from the 20 EMA. This moving average helps confirm whether the current trend is strong enough to continue.
Step 4: Add the 200 EMA
Add a third EMA and set the period to 200. I use a yellow color because it clearly stands out on the chart. The 200 EMA acts as my long-term trend filter and helps me avoid trading against the overall market direction. Together, these three moving averages form the Best EMA Settings for XAUUSD that I rely on every day.
Step 5: Save Your Template
Once all three EMAs are added, save your chart as a template. This allows you to load the same setup instantly whenever you open a new chart. Using a saved template ensures you always trade with the Best EMA Settings for XAUUSD without wasting time adjusting indicators.
My Preferred EMA Colors
For a clean and easy-to-read chart, I use:
- 20 EMA – Red
- 50 EMA – Blue
- 200 EMA – Yellow
These colors help me recognize trend alignment at a glance and keep my charts organized.
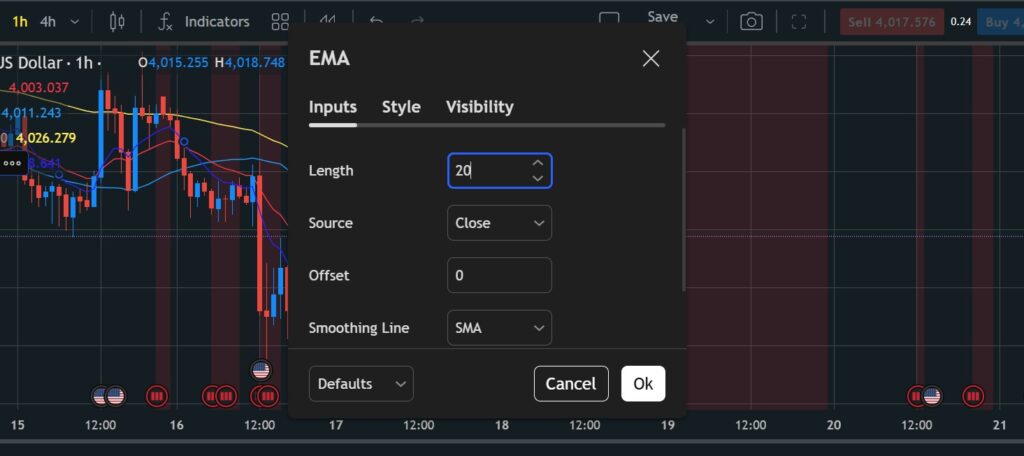
The image above shows the EMA (Exponential Moving Average) settings window in Enxess. This is where you configure the moving average before applying it to your XAUUSD chart. In my strategy, I use this window to create the 20 EMA, 50 EMA, and 200 EMA, which form the foundation of my trading setup.
Better Trend Identification Using EMAs
One of the biggest advantages of using the Best EMA Settings for XAUUSD is that they help traders identify the market trend with greater accuracy. Since the Exponential Moving Average (EMA) gives more weight to recent price movements, it reacts faster than a Simple Moving Average (SMA). This allows traders to recognize trend changes earlier and make more informed trading decisions.
When the shorter EMA, such as the 20 EMA, stays above the longer EMA, like the 50 EMA, it generally signals a bullish trend. On the other hand, when the 20 EMA crosses below the 50 EMA, it often indicates a bearish trend. These crossover signals become even more reliable when combined with strong price action and key support or resistance levels.
Using the Best EMA Settings for XAUUSD also helps traders avoid trading against the dominant market direction. Instead of entering random trades, they can focus only on buying during uptrends and selling during downtrends. This simple approach improves trade quality and reduces unnecessary losses.
Another benefit of the Best EMA Settings for XAUUSD is that they filter out minor market fluctuations. Gold prices are highly volatile, and small price movements can create false signals. The EMA smooths these fluctuations, making the overall trend much easier to read.
Professional gold traders often combine the Best EMA Settings for XAUUSD with other confirmation tools such as RSI, MACD, or candlestick patterns. This combination increases confidence in trade entries and exits while improving overall trading performance. By consistently following the trend identified by the Best EMA Settings for XAUUSD, traders can make more disciplined decisions and increase their chances of long-term success.